


 Premiere Pro tips… Adding or altering timecode
A cheap and cheerful way of creating a multi-camera sequence in Premiere Pro is to use cameras such as mobile devices, DSLRs and GoPros. However, these cameras do not generate their own burnt-in timecodes, making it difficult to synchronise the pictures later if there was only one operator or there is lag in the sound.
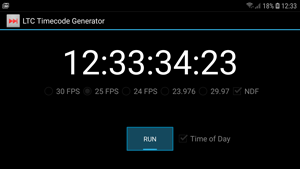
A solution is to create your own timecode by showing each running camera a phone displaying timecode which is derived from the phone’s internal clock. There are a variety of timecode apps available today, and any of them will do. I use LTC Timecode Generator.
You must remember to set it to the correct frame rate:
You can then reprogram the timecode of any clip by selecting it in the Project panel and choosing Clip > Modify > Timecode. (By default, the timecode of clips without burnt-in code, such as those created by GoPro and DSLR cameras, is 0.)
In the dialog box displayed, you can enter a new start timecode, in line with the timecode that your mobile phone was displaying when held in front of your GoPro/DSLR.
Then, when creating your Multi-camera Source sequence, you’ll be able to choose the Timecode radio button and jam-lock the pictures without relying on the audio or pointing all of the cameras at the same location.
I this is useful to you!
Chris
Armada offers Premiere Pro training to users at all levels. See Introduction to Premiere Pro and Advanced Premiere Pro.

Leave a comment